The Most Accurate White Balance Method in DaVinci Resolve (2026): Vectorscope-First Pro Workflow
Focus Keywords: DaVinci Resolve white balance, vectorscope white balance, DaVinci Resolve skin tone indicator, accurate white balance colorist
The Nightmare Every Colorist Knows
A clip lands on your timeline, the input/output colour space is set, and the white balance is so far off that you know — before you've touched a single wheel — that the next twenty minutes belong to this one shot. This happens constantly with heavily processed camera colour science, and if you're also handling multiple clips from multiple cameras in the same project, fixing white balance one by one becomes the single biggest time sink in the entire grade.
Most tutorials teach you to fix this using the RGB Parade and Waveform first. I'm going to show you a faster way — one that starts with the Vectorscope instead, because it tells a beginner something Parade and Waveform don't: which direction to actually push the wheel.
Why Vectorscope-First Beats Parade-First for Beginners
Most colour grading courses (mine included, a few years ago) teach white balance through the Parade and RGB Waveform — reading red, green, and blue channel levels and matching them by eye. It works, but it assumes you already know what "matched" looks like on a graph. A beginner staring at three overlapping colour traces has no idea which way to move the wheel.
The Vectorscope solves this instantly. It's a circular plot — if your white balance is accurate, your entire trace sits centred. The moment there's a colour cast, the trace visibly leans toward whichever hue is contaminating the image: red, magenta, yellow, green. You don't need to interpret levels — you just look at which direction the trace is pointing, and push the Offset wheel the opposite way.
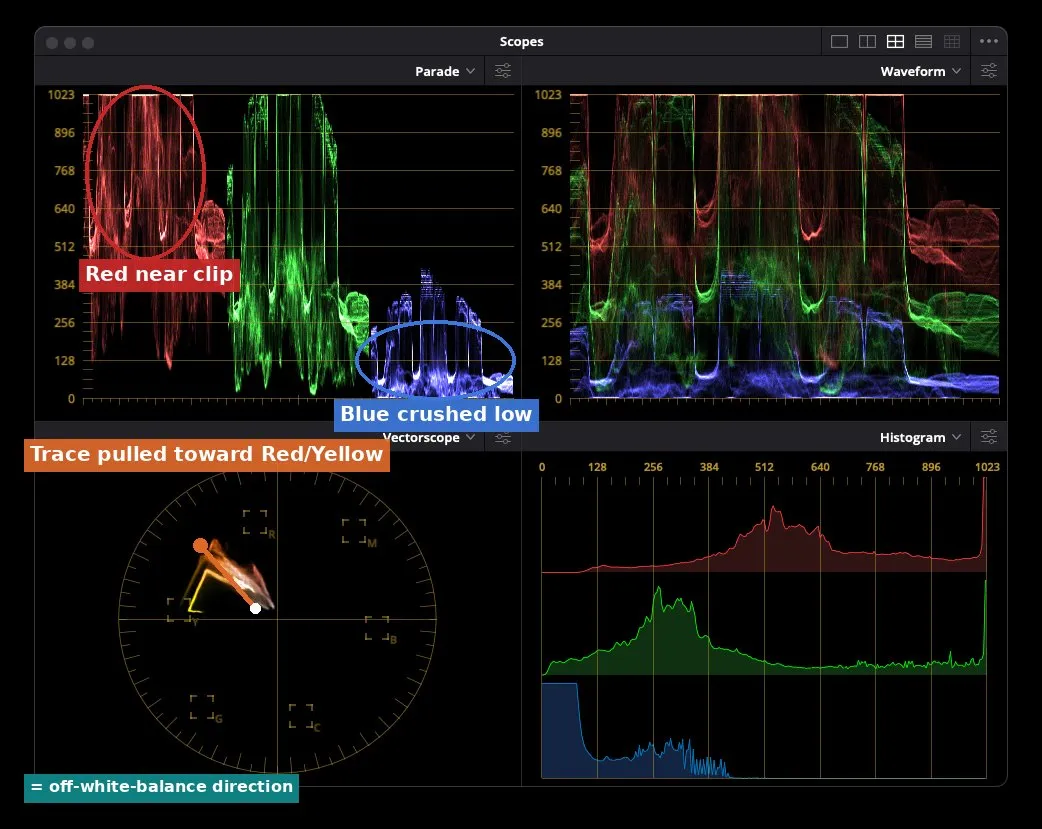
A genuinely bad white balance case, no correction applied yet — only Input/Output colour space set. Red is clipping in the Parade, Blue is crushed near the shadows, and the Vectorscope trace (bottom-left) is dragged toward red/yellow instead of sitting centred. That's your diagnosis in one glance.
Step 1: Isolate the Problem — Colour Space Only, Nothing Else
Before touching a single wheel, set only your Input and Output Colour Space on the first node and look at the image raw. Don't be tempted to eyeball-correct from the viewer — some monitors and displays (especially if you're grading under a strong key light that bounces onto your screen) make footage look more balanced than it actually is on the scopes. Trust the scopes over your eyes at this stage, always.
Step 2: Global Correction with the Offset Wheel + Vectorscope
Once you can see the direction your Vectorscope trace is leaning, go to the Offset wheel in Primaries and nudge it in the opposite direction. This alone typically recovers 50% or more of a badly off clip in one move, because Offset shifts the whole tonal range together rather than isolating highlights or shadows.
Don't chase dead centre immediately. If you push Offset aggressively to force the trace perfectly to centre, you'll often crush your shadows into an opposite colour cast — green shadows if you were correcting a magenta cast, for example — because the image was never uniformly off in the first place. Find the sweet spot: balanced enough that the cast is gone, without introducing a new one in the opposite tonal range. You'll fine-tune shadows and highlights separately in the next steps anyway.
Step 3: Turn On Cursor-Linked Scope Highlighting
This is the setting that makes every following step accurate instead of guesswork: enable Display Qualifier/Cursor Focus from the scopes options. With it on, wherever you hover your mouse over the image, that exact pixel highlights live across every scope — Parade, Waveform, and Vectorscope simultaneously. Instead of guessing which part of the trace corresponds to the skin, the wall, or the highlight on a necklace, you point at it and watch the scopes respond in real time.
Step 4: Find a White or Grey Reference — It Does 90% of the Work
Before you correct anything further, scan the frame for anything that's supposed to be neutral white or grey — a shirt, a wall, a pearl, teeth, the whites of the eyes. If you find one and sample it with cursor-linked scopes, you instantly know your true white balance target: a neutral white should sit dead centre on the Vectorscope and read equally across R, G, and B on the Parade. Everything else in your correction becomes easier once you have this one known reference point.
This is exactly why I picked a genuinely extreme example for this breakdown — the clip had both terrible colour and a visible white object in frame, so the correction could be verified accurately instead of guessed.
Step 5: Split Highlights and Shadows — Don't Fix Both With One Wheel
Once your global Offset pass is done, go back to the scopes and look separately at where your highlights sit versus your shadows. In the example clip, highlights were pulling green while shadows were pulling magenta/red — two different casts in two different tonal ranges, which is common with heavily processed camera colour science.
- Fix highlights with the Gain wheel — nudge opposite to whatever direction the highlight cluster leans on the Vectorscope.
- Fix shadows with the Lift wheel — same logic, opposite direction, smaller moves. Shadows are far less forgiving than highlights; a small Lift move creates a bigger visible shift than the same move on Gain.
- Work in small increments and re-check — fixing shadows often reintroduces a bit of cast in the highlights and vice versa. This back-and-forth is normal, not a sign you're doing it wrong.
Split your correction across two nodes — one for the raw colour-space pass, one for the Offset/Gain/Lift correction — so you can toggle the node on and off to compare before and after honestly, instead of trusting your eye's memory of what the shot looked like five minutes ago.
Step 6: RGB Mixer for Stubborn Residual Colour
Primaries wheels correct colour by adding the opposite hue — pushing toward green technically means adding a bit of magenta to balance it, which is fine until you need to remove a colour rather than balance it. For that, use the RGB Mixer. It lets you pull a channel's contribution down directly — for example, dial back how much Red feeds into the Red output — which gives you a different kind of control than the primary wheels, especially useful when Lift/Gain/Offset alone won't fully settle a stubborn cast. The trade-off: RGB Mixer doesn't give you the same tonal-range separation (shadows vs highlights) that the primary wheels do, so use it as a finishing tool after your wheel-based pass, not as your first move.
Real Example: No White Reference in the Frame — Use the Skin Tone Indicator
Most shots won't hand you a convenient white or grey object. For a second clip — this one shot on a Sony FX3, no white object anywhere in frame — the reference point shifts to skin tone instead.
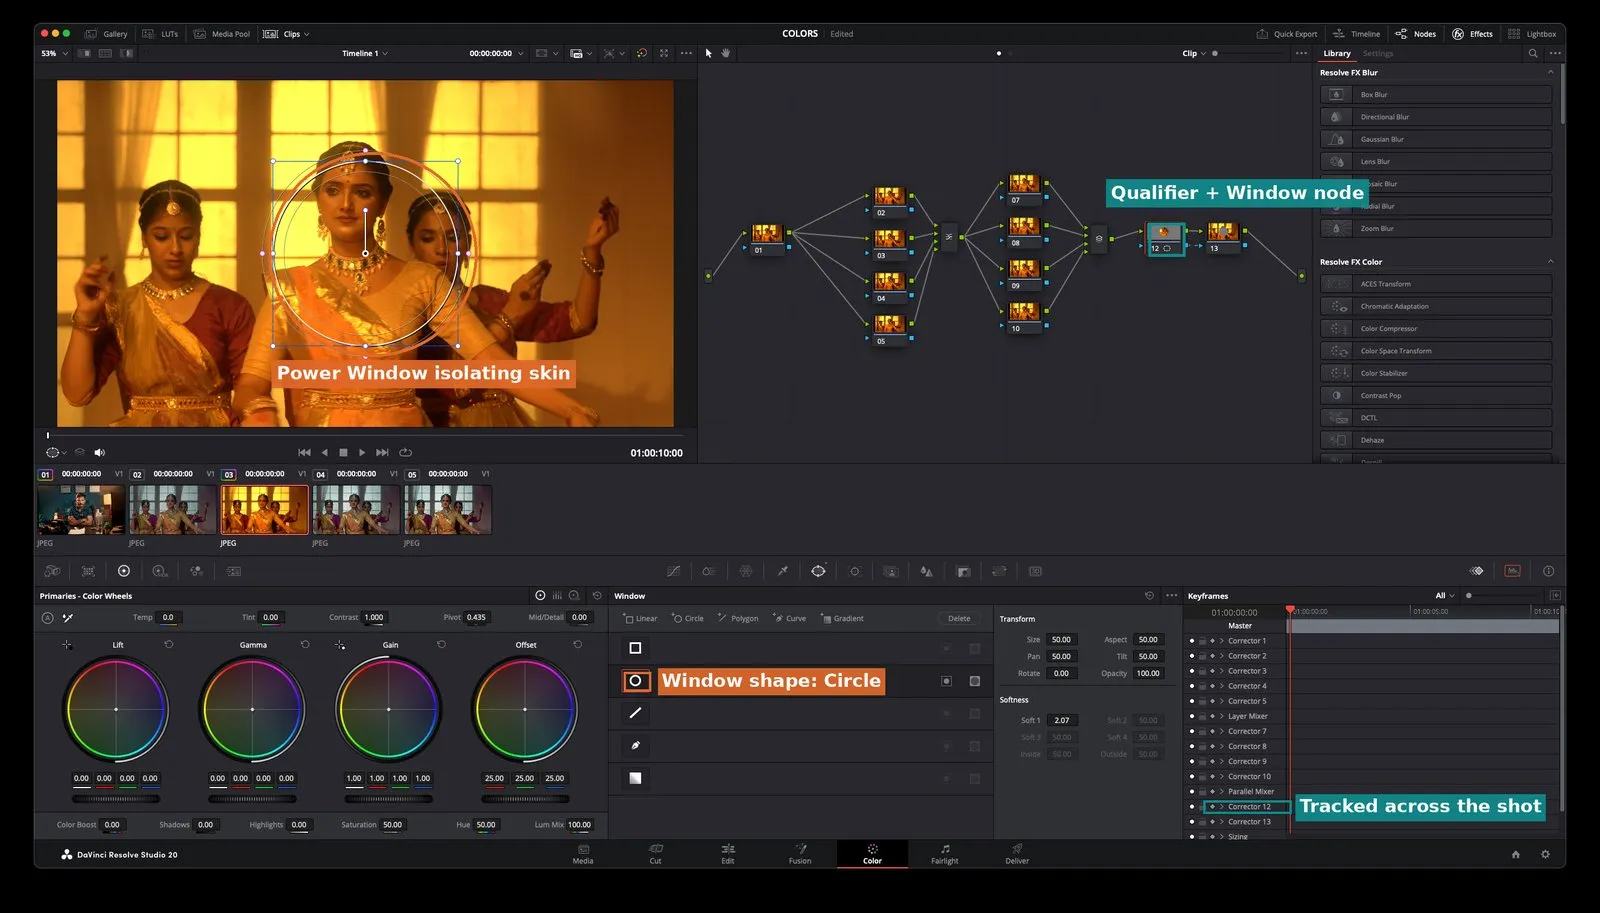
Isolating a clean patch of skin with a qualifier + tracked Power Window — deliberately a small sample away from the busy yellow background so the qualifier doesn't pick up spill. Node 12 (highlighted) holds the qualifier + window, tracked frame-by-frame in the Keyframes panel.
In the Vectorscope options, enable Show Skin Tone Indicator — this draws a reference line across the Vectorscope representing the expected hue range for natural skin tone. Then:
- Do your colour-space transform on an earlier node first — qualifying skin tone directly on a wide-gamut input space is unreliable, since the gamut is too broad for a clean isolation.
- On a node after the colour-space transform, use an HSL qualifier to select a clean patch of skin — face or arm, away from background spill.
- Track it if the subject moves, so the sample stays accurate across the shot.
- Watch where that sampled skin tone falls relative to the Skin Tone Indicator line on the Vectorscope, and nudge Offset until it sits on the line.
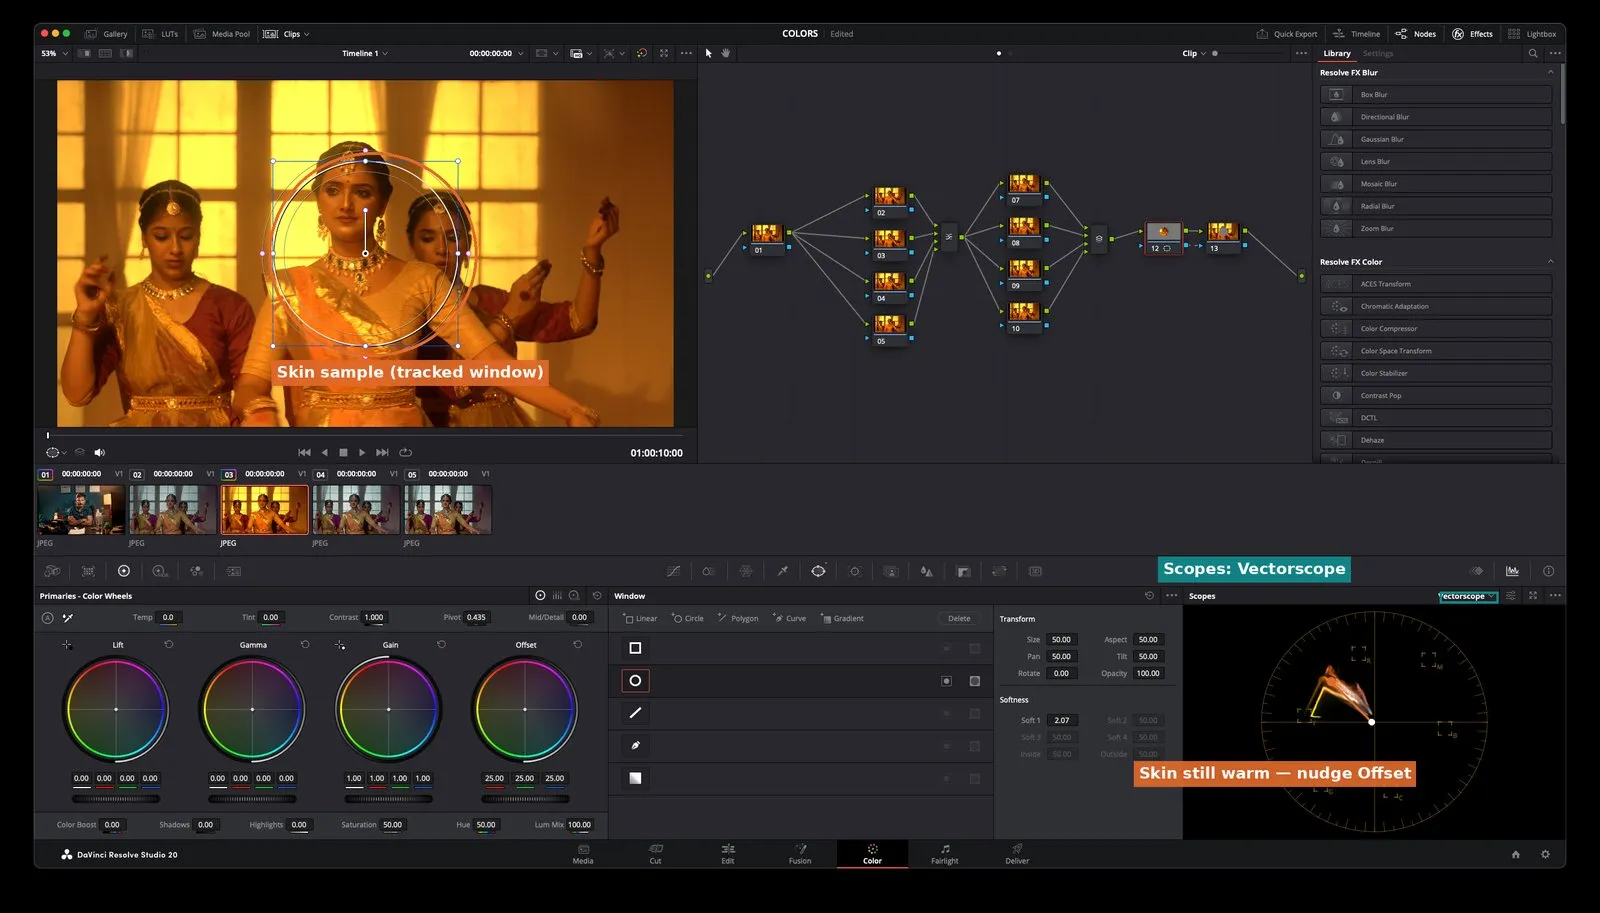
Same tracked skin sample, scopes panel switched to Vectorscope — the sampled skin still reads warm at this point, telling us exactly which way to nudge Offset next.
Check the Shadows Again — Qualifying Skin Can Reintroduce a Cast
Here's the part most tutorials skip: correcting skin tone on the highlights often bleeds a colour shift into your shadows, because you were sampling one specific tonal region and adjusting Offset globally. Use the qualifier's isolated selection to check the Parade/Waveform on just the shadow region — if you see residual green or magenta creeping in, pull it back out using the Lift wheel specifically, not Offset again. This is genuinely iterative: fix highlights, check shadows, fix shadows, recheck highlights, until both settle without fighting each other.
One reliable tell that you've nailed it: skin regains what I'd call "juice" — it stops looking flat and dull-white and starts looking naturally alive, with even tone across the face instead of patchy warm/cool zones.
Before and After
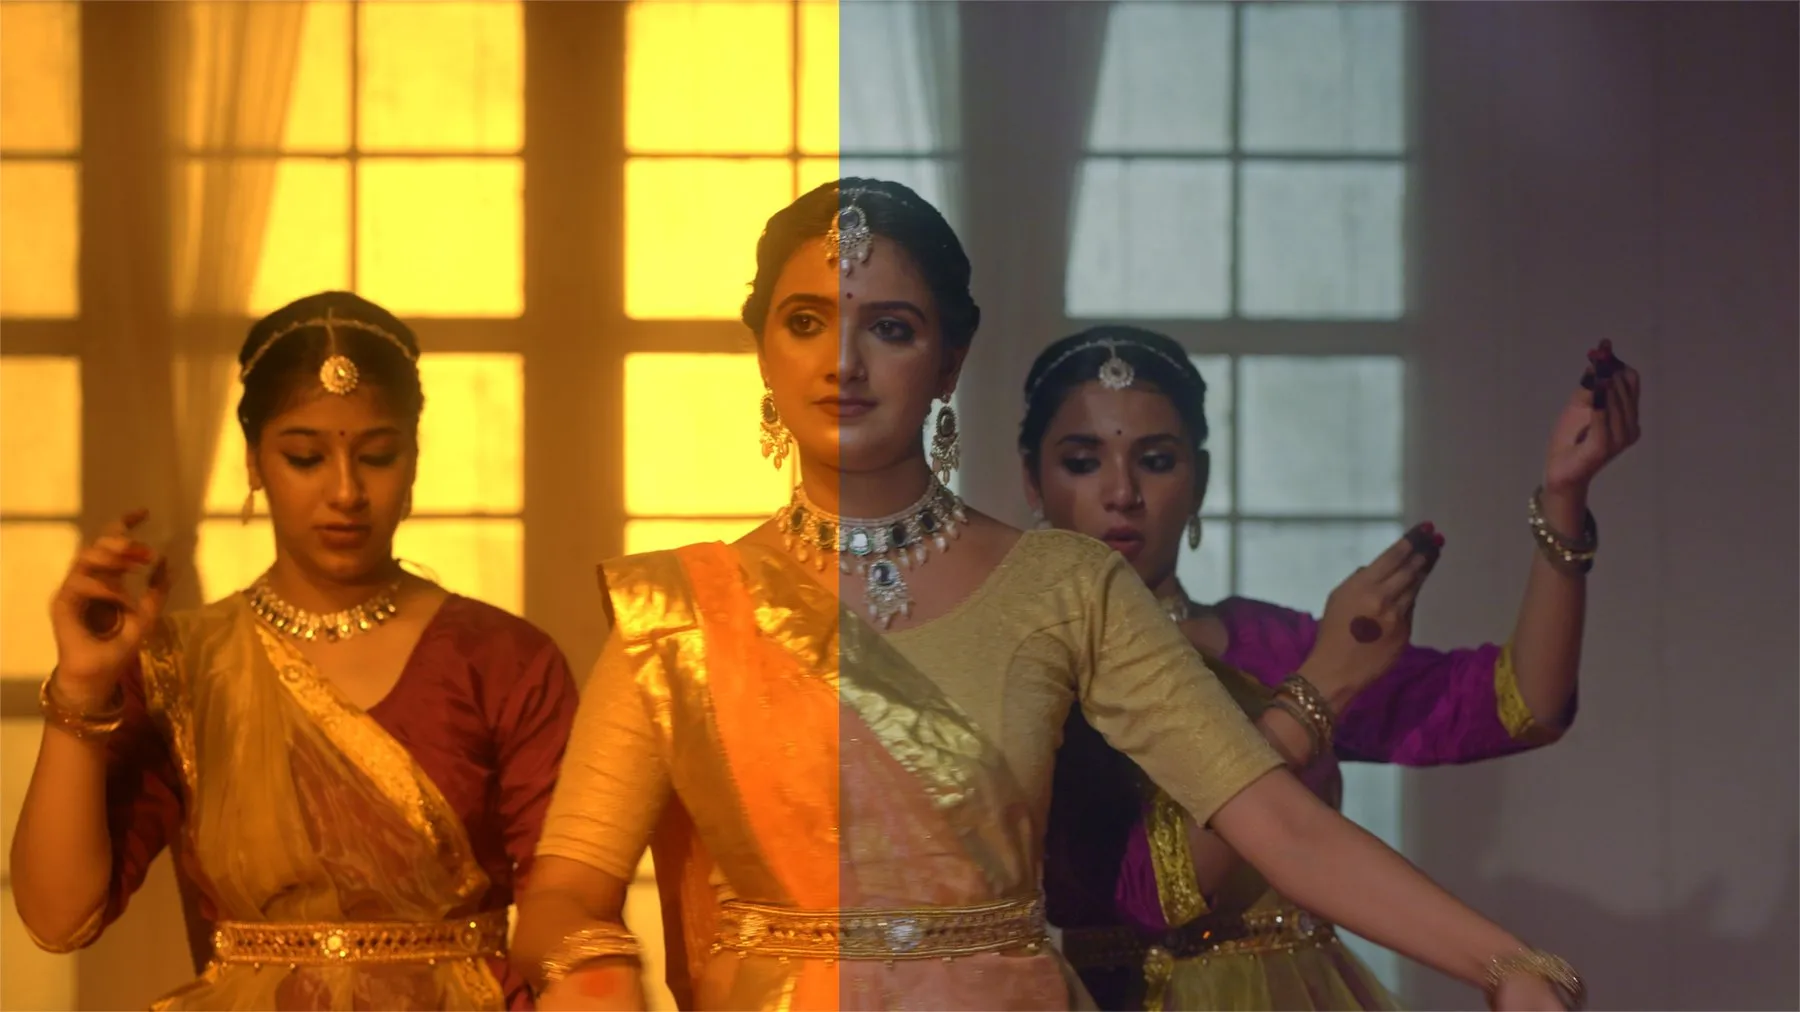
Left half: uncorrected, warm cast pulling the whole frame yellow-orange. Right half: corrected using the Vectorscope + Skin Tone Indicator workflow above — same shot, same light, natural skin tone restored.
Quick Recap
| Step | Tool | What It Solves |
|---|---|---|
| 1. Diagnose | Vectorscope | Shows you which direction the colour cast leans — no guesswork |
| 2. Global fix | Offset wheel | Recovers the bulk of a bad cast in one move |
| 3. Precision reading | Cursor-linked scopes | Confirms exactly what any point in the image reads on every scope |
| 4. Ground truth | White/grey reference | Gives you a known-neutral target to correct against |
| 5. Fine-tune | Gain (highlights) / Lift (shadows) | Separates corrections by tonal range instead of one blanket fix |
| 6. Stubborn cast | RGB Mixer | Removes a channel's contribution directly when wheels aren't enough |
| 7. No white object | Skin Tone Indicator | Gives you a reference target even without a neutral object in frame |
Want the full colour grading workflow — nodes, qualifiers, skin isolation, and scene-matching across multiple cameras?
Check out Decoding DaVinci Resolve →Quick FAQ
Q: Why use the Vectorscope instead of the Parade for white balance?
The Vectorscope shows direction — which way a colour cast is leaning — at a glance. The Parade shows channel levels, which is more precise for fine-tuning but much harder for a beginner to interpret quickly.
Q: What's the Skin Tone Indicator in DaVinci Resolve?
A reference line on the Vectorscope representing the expected hue range for natural skin tone. Sample a clean patch of skin and check it against this line when there's no white or grey object in frame to reference instead.
Q: Should I qualify skin tone before or after the colour space transform?
After. Qualifying on a wide-gamut input space before the transform gives unreliable, overly broad selections.
Q: Why does fixing highlights sometimes mess up my shadows?
Because Offset-based corrections shift the whole tonal range together. Always re-check shadows after a highlight fix, and use Lift specifically to correct them rather than pushing Offset again.
